From your first adventure to a stronger team. Choose a topic to learn more.
New to MonMon Masters? Learn how to start your adventure, raise MonMon, and tackle battles. Open a topic to read all its tips in one place.
01
Getting started
Starting your adventure
Choose your first MonMon companion and head out into the field.
Battle other Tamers and capture wild MonMon as you explore.
Follow the on-screen guidance and missions at first. They will introduce you to raising MonMon and building a team.
The field and town
The field is where you explore and battle alongside your MonMon.
Field — Check road progress at the top and Missions at the bottom left. Use Battle at the bottom right to challenge an opponent, or Town in the bottom menu to visit town.Town — Visit facilities such as the Hatchery, Training Center, and Mine. Check Missions at the bottom left, or use Field in the bottom menu to return to your adventure.
Progress through your current region to reach the next one. You can check regions on the World Map.
The town has facilities such as the Hatchery, Training Center, and Mine. Visit new facilities as they unlock to see what you can do there.
Following missions
Check your missions whenever you are unsure what to do next.
Check your current objective, progress, and rewards. Select View Details for more information, or Go to reach the relevant location.
Missions guide you through activities such as raising MonMon, equipping Runestones, and battling.
Complete the objective and claim its reward to move on to the next mission. Follow them to strengthen your team step by step.
Locked content
Not every feature is available from the start.
Progress through the field or meet the required conditions to unlock more facilities and content.
Select locked content to check its unlock requirements. If it is not available yet, continue your field adventure and missions.
02
Obtaining MonMon
Capturing wild MonMon
Try capturing a wild MonMon when you encounter one that can be captured in the field.
Check the target MonMon and Capture Rate, then use Capture to stop the net roulette.
Stop the net roulette to determine which net you will use. Higher-rarity nets have a better chance of a successful capture.
If the capture fails but the MonMon has not fled, you can use Berries to try again.
When a retry is offered, check the Capture Rate and required Berries. This example costs 2 Berries to select Capture. Select Give Up if you do not want to try again.
Hatching eggs
Use MonMon Eggs at the Hatchery to meet new MonMon.
Choose an egg type at the top and check your egg quantity and the Gold cost on Hatch or Hatch x10. Select the information icon beside the egg name to open Rate Info.
The possible MonMon rarities and hatch rates differ by egg type.
In Rate Info, open the Hatch Rate tab to compare the available rarities and their probabilities for each egg type.
Before hatching, check Rate Info for the rarity-based hatch rates of each egg type. Once you get a MonMon you want, add it to your team or raise it.
Exchanging MonMon
Exchange specified material MonMon for a new MonMon.
The MonMon at the top is the one you will obtain. Check the material MonMon below it and their star and level requirements, then prepare the required materials.
Select the MonMon you want to obtain and check the required materials and growth conditions. Prepare the material MonMon to meet those conditions before exchanging.
Material MonMon are consumed. Make sure you are not using a MonMon you still want to keep.
Restoring MonMon from fragments
Collect MonMon Fragments to restore the corresponding MonMon.
Choose a MonMon from the list below and check its shard count in the center. In this example, 0/100 means none of the 100 required shards have been collected yet.
Check your fragment balance and the amount required on the restoration screen. Collect 100 fragments of the same MonMon to obtain that MonMon.
The Mondex
Check the Mondex for MonMon information and how to obtain them.
Browse MonMon names and icons in the list. Use Filter and By Rarity at the top to find a MonMon, then select it to view its details.
When you find a MonMon you like, look at its role, species, and skills. Try finding one with abilities your current team lacks.
03
Team setup and combat
Team setup and positioning
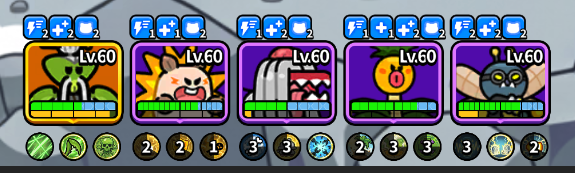
Most battles let you build a team of up to 5 MonMon.
Check your five MonMon and their positions on the left, then choose participating MonMon from the list below. Use Team Setup to adjust your team, and compare it with the enemy on the right.
Entry restrictions can vary by content, so check them before battling.
Choose positions based on each MonMon's attack style and role. As a starting point, place melee MonMon toward the front and ranged MonMon toward the back.
If a MonMon falls too quickly, try changing its position or adding an ally that protects or heals your team.
The four MonMon roles
MonMon have four roles.
Attack: Deals heavy damage to enemies.
Defense: Protects allies or takes damage for them.
Control: Disrupts enemy actions or applies harmful effects.
Support: Heals allies or grants helpful effects.
Instead of filling your team with attackers, include MonMon that protect allies and disrupt enemies. Even MonMon with the same role excel in different situations depending on their skills.
Species and Tribe Advantage
Each MonMon belongs to a species, such as Fire, Aqua, or Beast.
In this example, the MonMon deals 35% more damage to Poison, Insect, and Undead MonMon. Check your own MonMon's Tribe Advantage for the affected species and effects.
MonMon also have Tribe Advantage against particular species. These can increase damage dealt to that species or reduce damage received from it.
If an enemy is difficult to defeat, check its species and try bringing MonMon with an advantage against it.
Using skills
MonMon battle using basic attacks and skills.
When an active skill is ready, tap its button to activate it.
Skills can attack enemies, heal allies, grant shields, weaken enemies, and more. Read their descriptions and use them when needed.
Passive skills apply their effects when their conditions are met, without you pressing a skill button.
Turns and cooldowns
Combat takes place in real time, and each MonMon has its own turns.
Before use — When the yellow skill gauge reaches 100%, an active skill becomes available.After use — The full yellow gauge disappears when the skill is used.
When the skill gauge reaches 100%, an active skill becomes available. Normally, a MonMon fills its gauge over 10 basic attacks. Effects that increase or decrease the gauge can change the number of attacks needed.
After the active skill's attacks and effects finish resolving, that MonMon's turn ends. Each MonMon has its own turns, rather than sharing a turn that ends once everyone has acted.
Higher Speed makes basic attacks and skill gauge charging faster.
For example, a MonMon with 200 Speed attacks and charges its gauge at twice the base rate of one with 100 Speed.
Actual skill intervals also depend on cooldowns, Stun and Silence, other skills' animations, and manual waiting.
Some active and passive skill effects activate whenever their conditions are met. Others have a cooldown after activating. Turn-based cooldowns decrease by 1 turn at the end of that MonMon's turn.
For example, a cooldown with 2 turns remaining counts down 2 turns → 1 turn → 0 turns as that MonMon's turns end, making the effect available to activate again. Another MonMon's actions, or simply waiting without using a skill, do not reduce it.
Check the skill icons below each MonMon card for remaining cooldowns. These are separate from the buff and debuff duration counters above the cards.
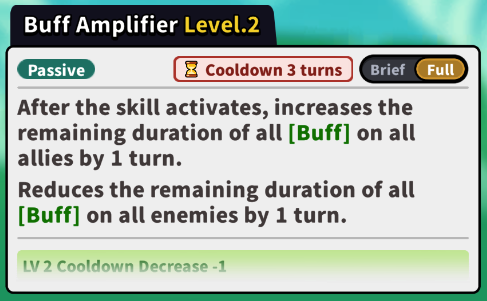
Check the hourglass icon in skill information for cooldowns. If a cooldown decreases as the skill levels up, the reduced number of turns is also reflected in its description.
The cooldown appears beside the hourglass icon in skill information. This example shows Buff Amplifier at Level 2 with a cooldown of 3 turns.
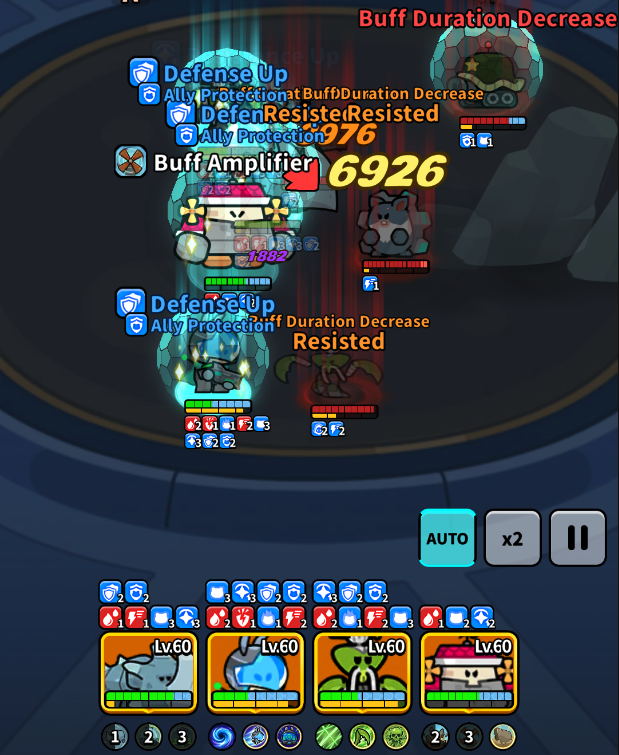
Buff and debuff durations count down using the affected MonMon's turns. Normally, the remaining duration decreases by 1 turn when that MonMon's turn ends, and the effect ends at 0 turns.
For example, a 2-turn Defense Up buff received from an ally counts down 2 turns → 1 turn → 0 turns as the affected MonMon uses active skills and their results finish resolving. Actions by the MonMon that granted the buff, or by any other MonMon, do not reduce its duration. Exceptions include removal by another effect and the special rules below.
Higher Speed can make a MonMon's turns end more often, so the same 2-turn effect can last a shorter amount of real time.
Special rules apply in the following situations.
When you manually wait instead of using an available skill: Every 5 seconds of in-game waiting time, only buff/debuff durations and damage/healing over time advance by 1 turn. Each effect tracks this wait separately, starting from when it was applied. Waiting alone does not reduce skill or effect cooldowns.
When Stun, Silence, or a similar effect makes you miss a skill opportunity: The MonMon's turn may still resolve without using a skill, reducing ongoing effects and cooldowns.
Permanent effects and special boss mechanics: These may work differently from the normal turn countdown and gauge charging rules. Check the relevant skill and boss guide descriptions.
Skill timing and auto battle
Early in your adventure, a timing prompt appears when you use a skill.
Tap the screen when the moving needle enters the green area to use a more powerful skill.
Once AUTO unlocks through adventure progress, the timing prompts end and you can let MonMon use skills automatically. Turn AUTO off to tap skill buttons at the moments you choose.
You can also speed up combat once battle speed controls unlock.
Buffs and debuffs
Buffs help allies, while debuffs hinder their targets.
Buff and debuff icons appear below MonMon gauges and above the cards at the bottom of the battle screen. Multiple icons appear when several effects are active. The numbers on these icons show their remaining durations.
Attack boosts and shields are buffs. Attack reductions and Poison are debuffs.
Some MonMon skills can remove debuffs from allies or buffs from enemies.
If your debuffs often fail to land, raise Accuracy. The higher your MonMon's Accuracy is compared to the target's Resistance, the more likely your debuffs are to land. If enemies keep debuffing your team, raise Resistance instead.
These effects can be essential in boss battles. Check your skill descriptions together with the boss's mechanics.
Buffs and debuffs measured in turns normally lose 1 remaining turn when the affected MonMon's turn ends. Their duration is separate from a skill effect's cooldown.
04
Raising MonMon
Rarity, gold stars, and purple stars
Rarity and the stars shown in MonMon information mean different things.
Check rarity and stars at the top, and the current and maximum level above the stats. This example shows Legendary rarity, purple stars, and Lv.60/60.
Rarity:Common, Uncommon, Rare, Epic, or Legendary.
Gold stars: The MonMon's rank. A higher rank raises its maximum level.
Purple stars: Its evolution stage. Evolution improves stats and skills.
Increasing gold stars through Rank Up does not change a MonMon's rarity.
Leveling up
MonMon gain experience in battle or through Level Up.
Select XP Drinks and their quantities from the list below. This example uses 48 drinks to raise Flanix from level 20 to its maximum level of 50. Check the resulting level and the 336K Gold cost before selecting Level Up.
Use XP Drinks or material MonMon to level up. Higher levels increase basic stats such as HP, Attack, and Defense.
If a MonMon has reached its maximum level, check Rank Up. MonMon used as leveling materials are consumed.
Ranking up
Rank Up increases a MonMon's gold-star rank and raises its maximum level.
Check the stars, selected materials, and Gold cost before selecting Rank Up. This example uses two pieces of Rank Up Meat and two material MonMon, with a cost of 22.4K Gold.
Use material MonMon of the same rank or Rank Up Meat and other eligible materials.
Ranking up resets the MonMon to level 1 and lets it reach a higher maximum level. Raise its level again through battles or XP Drinks afterward.
Selected material MonMon are consumed, so check them before confirming.
Evolving MonMon
Use Evolution Crystals to increase a MonMon's purple-star evolution stage.
Check the before-and-after stars and Evolution Effects, then compare your Crystal quantities with the requirements below. In this example, the red Crystals are short at 0/5, while the white Crystals are sufficient at 30/4. Synthesis and Bulk Synthesis are shown below the material requirements.
Leveling up alone does not automatically evolve a MonMon. Open Evolution to check the materials and changes at the next stage.
Evolution increases stats and unlocks new passive skills at specified stages. Some MonMon also change appearance at certain stages.
Upgrading skills
Use Skill Books or duplicates of the same MonMon to upgrade skills.
Check each skill's current and maximum level, then choose Skill Books or eligible MonMon from the list below. Confirm the selected materials and Gold cost before selecting Skill Up. This example shows a cost of 24K Gold.
One eligible skill is upgraded at random. Depending on the skill, upgrades can improve damage or effect activation rates. Check each skill's information for its upgrade effects.
Skill Books and MonMon used as materials are consumed.
Empowering MonMon
Epic or higher-rarity MonMon can be empowered using duplicates of the same MonMon.
Select an eligible material MonMon and review Empower Stage and Empower Effect. Check the displayed stat increases before selecting Empower.
Empower permanently increases basic stats and can be performed up to 4 times.
Duplicates can also be used for Skill Up. Consider which upgrade you need before using them.
Training Center
MonMon placed in the Training Center accumulate experience over time.
When Level Up Ready appears, use the yellow Upgrade button to raise that MonMon's level. Slots still accumulating XP show XP per hour and To Next Level. You can also check each slot's level below.
Once enough experience has accumulated, tap Upgrade to increase their level.
Unlock more slots to train more MonMon. Upgrading a slot increases the rate at which experience accumulates.
MonMon in training cannot enter battles. Remove a MonMon from training before adding it to a team you want to use.
05
Runestones and accessories
Equipping Runestones
Runestones are equipment that increases a MonMon's stats.
Equip Runestones in the six slots. This example shows all six slots filled. If you are unsure what to choose, try Auto-Equip at the bottom.
There are 6 types: Sword, Helmet, Shield, Gauntlet, Armor, and Boots. Each goes into its matching slot.
Runestones can be used by any species. If you are unsure what to choose, start with Auto-Equip.
As you become familiar with equipment, choose stats that suit the MonMon's skills and role.
Runestone stats and rarity
A Runestone has 1 main stat and up to 4 substats.
Check stars, rarity, and upgrade level at the top. Main Stat shows the primary bonus, while Sub Stat lists the additional bonuses below. This example is a level-16 Epic Sword Rune with Attack 270 as its main stat.
Sword Runestones have Attack as their main stat, Helmets have HP, and Shields have Defense. Gauntlets, Armor, and Boots have a main stat selected from several possibilities.
Higher star ranks allow higher stat ranges. Higher rarity gives more starting substats. Upgrading a Runestone does not increase its star rank.
Runestone set effects
Equip the required number of Runestones from the same set to activate an extra effect.
The number in parentheses is the number of pieces needed to activate the set. Accuracy and Resistance require 2 pieces; Lifesteal, Regeneration, and Savage require 4. Check the effect listed beneath each set name.
Sets require either 2 or 4 Runestones. Use the 6 slots to combine three 2-piece sets, or one 4-piece set and one 2-piece set.
Check individual main stats as well as set effects. Different stats can change a MonMon's performance even within the same set.
Upgrading Runestones and accessories
Spend Gold to upgrade Runestones and accessories up to +16.
This example previews an upgrade from level 0 to 1, raising Attack from 25 to 35. Check the stat changes and the 600 Gold cost on Upgrade. The separate Upgrade with Lv.4 button shows its own cost.
Upgrades do not fail, and each upgrade level increases the main stat.
At +4, +8, +12, and +16, a substat is added or an existing one improves. Which stat improves and by how much is random.
Higher upgrades cost more Gold. Prioritize equipment suited to the MonMon you use most.
Equipping accessories
Accessories come in 3 types: Orb, Pendant, and Banner.
This example has a Ghost Orb equipped. Check Equippable and Not Equippable in the list for species restrictions, and use the three slots at the bottom to switch accessory types.
Equip them in slots separate from Runestones to further increase a MonMon's stats.
Accessories are species-specific.
For example, a Fire accessory can only be equipped by a Fire MonMon.
If you cannot equip one, check the MonMon's species and the slot's unlock requirements.
Polishing equipment
Use Polish Stones to further increase existing substats on Runestones and accessories.
Choose the substat to improve and a matching Polish Stone. This example shows Speed 6 with an increase range of 1–2. Check the 10K Gold cost before selecting Polish.
Polishing does not change the substat's type. Choose a Polish Stone that matches the equipment and the stat you want to improve.
When polishing again, the result replaces the previous polish value only if it is higher. Obtain Polish Stones from Habitat Clash.
Finding and sorting equipment
Filter your equipment and decide which pieces to keep or sell.
Choose which equipment to display. This example selects Sword Rune and Show Only Selected Slot's Type. Use Reset to clear the filter conditions.
Use filters to find the type, set, and stats you want as your collection grows.
Lock equipment you want to keep. Sell unwanted equipment for Gold.
In the Runestone Auto-Sell Filter for Multi-Battle, select the Runestones you want to keep. Unselected Runestones will be automatically sold. Review the conditions for each slot before starting.
Select the Runestones you want to keep; unselected Runestones will be automatically sold. Review the rank, rarity, and set effect conditions for each slot before selecting OK.
06
Field and dungeon strategy
Progressing through the field
Explore new regions and battle other Tamers in the field.
Participating MonMon gain experience, and progressing through the adventure unlocks more content.
If progress becomes difficult, check your MonMon's levels, ranks, evolutions, skills, and equipment. Gather materials elsewhere to strengthen your team before trying again.
Field Challenge
In Field Challenge, battle Tamers you have met in the field again to obtain Runestones.
Choose the difficulty at the top right and check the available set and star range. This example offers 4–6-star Nemesis Runestones. Review each stage's reward and the Energy cost on Battle before choosing a stage.
Each region offers different Runestone sets. Check which set you need and challenge a stage in the corresponding region.
Higher difficulties offer better rewards. For repeated runs, choose a stage your team can clear reliably.
Finding the right dungeon for materials
Spend the required Energy to battle dungeon bosses and obtain growth materials.
Choose the material category using the tabs at the top, then check dungeon names and reward icons. Availability timers, opening days, and padlocks help you see which dungeons are currently accessible.
Choose a dungeon that drops the materials you need.
Materials and where to find them
What you need
Dungeon
Common Evolution Crystals
White Crystal Island
Support Evolution Crystals
Green Crystal Island
Attack Evolution Crystals
Red Crystal Island
Defense Evolution Crystals
Blue Crystal Island
Control Evolution Crystals
Purple Crystal Island
XP Drinks and Gold
Goblin Territory
Runestones
Canyon of Wind · Undead Castle · Ice Fortress
Accessories
Insect Queen's Hive
Rewards vary by dungeon and stage. Check the available rewards before entering.
Building a team for a boss
Each boss has different skills and mechanics.
Before battling, check the boss guide and recommended MonMon to find the skills you need.
Bring MonMon that counter the boss's mechanics, rather than relying only on high Attack.
For example, use multiple hits to break the Ice Shield in Ice Fortress. In Undead Castle, quickly heal allies trapped in Nightmare.
Using Challenges
Challenges help you learn how to raise MonMon and build teams while clearing content.
If a dungeon is difficult, check its Challenges. Their objectives can help you learn which MonMon and skills to use.
After meeting an objective, check the Challenges screen for its reward.
07
Tamers League and the Temple
Tamers League
Face other Tamers' teams in the Tamers League.
Check an opponent's team and challenge it. Win points to work toward higher tiers and earn tier-based rewards.
Look at the opponent's MonMon lineup and species advantages as well as their combat power.
Attack and defense teams
In the Tamers League, set an attack team for your challenges and a defense team for other Tamers to face.
Adjust your attack team to suit the opposing lineup.
Your defense team may face many different opponents. Balance damage, survival, and healing.
After raising new MonMon, check both team setups.
Upgrading the Temple
Use medals earned in the Tamers League to upgrade the Temple.
The Temple upgrades stats such as HP, Attack, and Defense for the Element, Nature, and Chaos factions. Bonuses apply to MonMon in the corresponding faction.
Check the factions of your most-used MonMon and choose the stats they need.
08
Tamers Club and raids
Joining a Tamers Club
A Tamers Club is a group of Tamers who play and participate together.
Joining gives access to Club Raids, Club Quests, and the Club Shop. Read club descriptions and entry requirements to find one that suits you.
Club Raids
Club Raids are cooperative challenges in which club members fight the same boss.
Battle with your own team to deal damage and work with your club toward defeating the boss.
Check the boss's skills and build a team that can survive while dealing damage.
Check the raid screen for battle and boss-defeat rewards, including any rewards available to claim after your attempt.
Club Quests and the shop
Complete Club Quests to participate in club activities and earn rewards.
Check the available quests and their completion conditions.
Use club currency in the Club Shop. Look for growth materials you need, and check each item's purchase limit and refresh time.
09
Habitat Clash and Abandoned Tower
Habitat Clash
Habitat Clash requires a team of MonMon from a specified species.
For example, use Aqua MonMon in the Aqua habitat.
Win battles to obtain Polish Stones for improving equipment.
Raising MonMon from several species lets you challenge more habitats. Check the skills of MonMon you do not normally use in your main team, too.
Preparing a habitat team
MonMon of the same species can still have different roles and skills.
Within the required species, find MonMon that deal damage as well as those that protect allies.
If you lack eligible MonMon, check how to obtain them in the Mondex.
Start with a stage your current team can handle instead of aiming immediately for a high stage.
Abandoned Tower
Climb the Abandoned Tower by battling the enemies on each floor.
Some floors contain bosses with special skills. Check their skills and strategy before challenging a boss floor. Different floors require different abilities, so a varied roster helps.
Check the tower screen for required keys, the current event period, and available rewards.
10
Daily activities and overcoming obstacles
What should I do each day?
Check rewards and objectives when you log in, then focus on activities that help your current team.
Join content that is already unlocked. You can try the rest once it becomes available.
Check attendance and login rewards.
Collect accumulated Mine rewards.
Check MonMon ready to level up in the Training Center.
Check Daily Quests and your current missions.
Run Field Challenge or dungeons for growth materials you need.
Take part in the Tamers League and Club Raids.
Check Storage and events for rewards to claim.
If you cannot do everything, prioritize the materials you need and objectives you can complete.
Mine rewards
The Mine accumulates Gold and other items over time.
Rewards accumulate even while you are offline.
Rewards build up for up to 24 hours after your last collection. Claim them before the Mine fills up so it can keep accumulating rewards.
Multi-Battle
Use Multi-Battle to automatically repeat battles on stages you have already cleared.
Multi-Battle requires tickets and also consumes the entry resources for each battle. Check the repeat count and remaining resources before starting.
Set a MonMon queue to replace a MonMon that reaches its maximum level with the next one in line. This lets you raise several MonMon while collecting materials.
Background Multi-Battle
Background Multi-Battle lets you run Multi-Battle from the lobby without watching the battle screen.
The participating MonMon and their equipment have usage and modification restrictions. You also cannot enter another battle while it is running.
Finish Background Multi-Battle and check the results before starting a different battle.
When you keep losing battles
If you keep losing to the same opponent, check these points in order.
1. Level: Are any team members underleveled?
2. Rank: Can a MonMon at its maximum level rank up?
3. Evolution and skills: Have you missed available evolution or skill upgrades?
4. Equipment: Are any slots empty or Runestones unupgraded?
5. Team: Do you need a MonMon that protects or heals allies?
6. Enemy mechanics: Are you using species advantages and skills suited to the boss?
Team composition and skills matter even when your combat power is high. Also check the growth guidance shown after a defeat.
When you need more materials
If you lack upgrade materials, first check where to obtain them.
Get XP Drinks and Gold from Goblin Territory, Evolution Crystals from Evolution Crystal Dungeons, and Runestones from Field Challenge and Runestone Dungeons.
Collect materials from stages you can currently clear, strengthen your team, and retry the battle that stopped your progress.
Claiming quest rewards
Quests have daily, weekly, and monthly objectives.
Check the objectives and remaining time, then claim rewards for completed quests.
Claim rewards sent to Storage before the retention period shown on each message expires. Unclaimed rewards disappear after that period, so check the remaining time.
11
Tips for Faster Growth
Train Four MonMon at Once in Goblin Territory
Choose one MonMon that can reliably clear Stage 15 of Goblin Territory on its own. Fill the other four slots with MonMon you want to train. All four earn XP while the first MonMon handles the battle.
To train more MonMon, add them to the MonMon queue in Multi-Battle. When a trainee reaches its maximum level, the next MonMon in the queue takes its place.
Raise MonMon for Rank Up
When you use MonMon as Rank Up materials, their rank must match the rank of the MonMon you want to strengthen.
For example, to prepare materials for a 4-star MonMon, train 3-star MonMon in Goblin Territory until they reach their maximum level. Rank them up to 4 stars, then use them as materials for your main MonMon.
Learn more about MonMon and Runestones
Explore individual MonMon skills and acquisition methods, or look up detailed Runestone set effects.


 mission


 Hatchery
 Training Center
 Mine

 Runestone


 net roulette
 Berries

 MonMon Eggs


 Fragments


 Attack:
 Defense:
 Control:
 Support:
 Fire
 Aqua
 Beast


 Higher Speed
 cooldown
 Defense
 AUTO
 Attack
 Accuracy
 Resistance


 XP Drinks
 HP

 Meat
 Evolution Crystals

 Skill Books


 Gold

 Orb
 Pendant
 Banner

 Polish


 Multi-Battle


 Field Challenge

 Energy

 White Crystal Island
 Support Evolution Crystals
 Green Crystal Island
 Attack Evolution Crystals
 Red Crystal Island
 Defense Evolution Crystals
 Blue Crystal Island
 Control Evolution Crystals
 Purple Crystal Island
 Goblin Territory
 Canyon of Wind
 Undead Castle
 Ice Fortress
 Insect Queen's Hive

 Tamers League
 Temple

 Club Raids
 Club Quests
 Club Shop

 Abandoned Tower

 attendance